How To Explicitly Teach Phonics Rules
Why explicit phonics instruction matters
We know from research (and from the students we serve every day) that most students won’t figure out reading or spelling patterns on their own.
In fact:
About 15–20% of students can learn to read without direct instruction.
But the other 80–85% need explicit, structured instruction to make sense of phonics patterns.
This is especially true for students with dyslexia or other language-based learning challenges, who often struggle with implicit learning (i.e., picking up on patterns just by seeing them enough times).
Explicit instruction makes reading and spelling accessible to all students, not just the ones who “get it” intuitively.
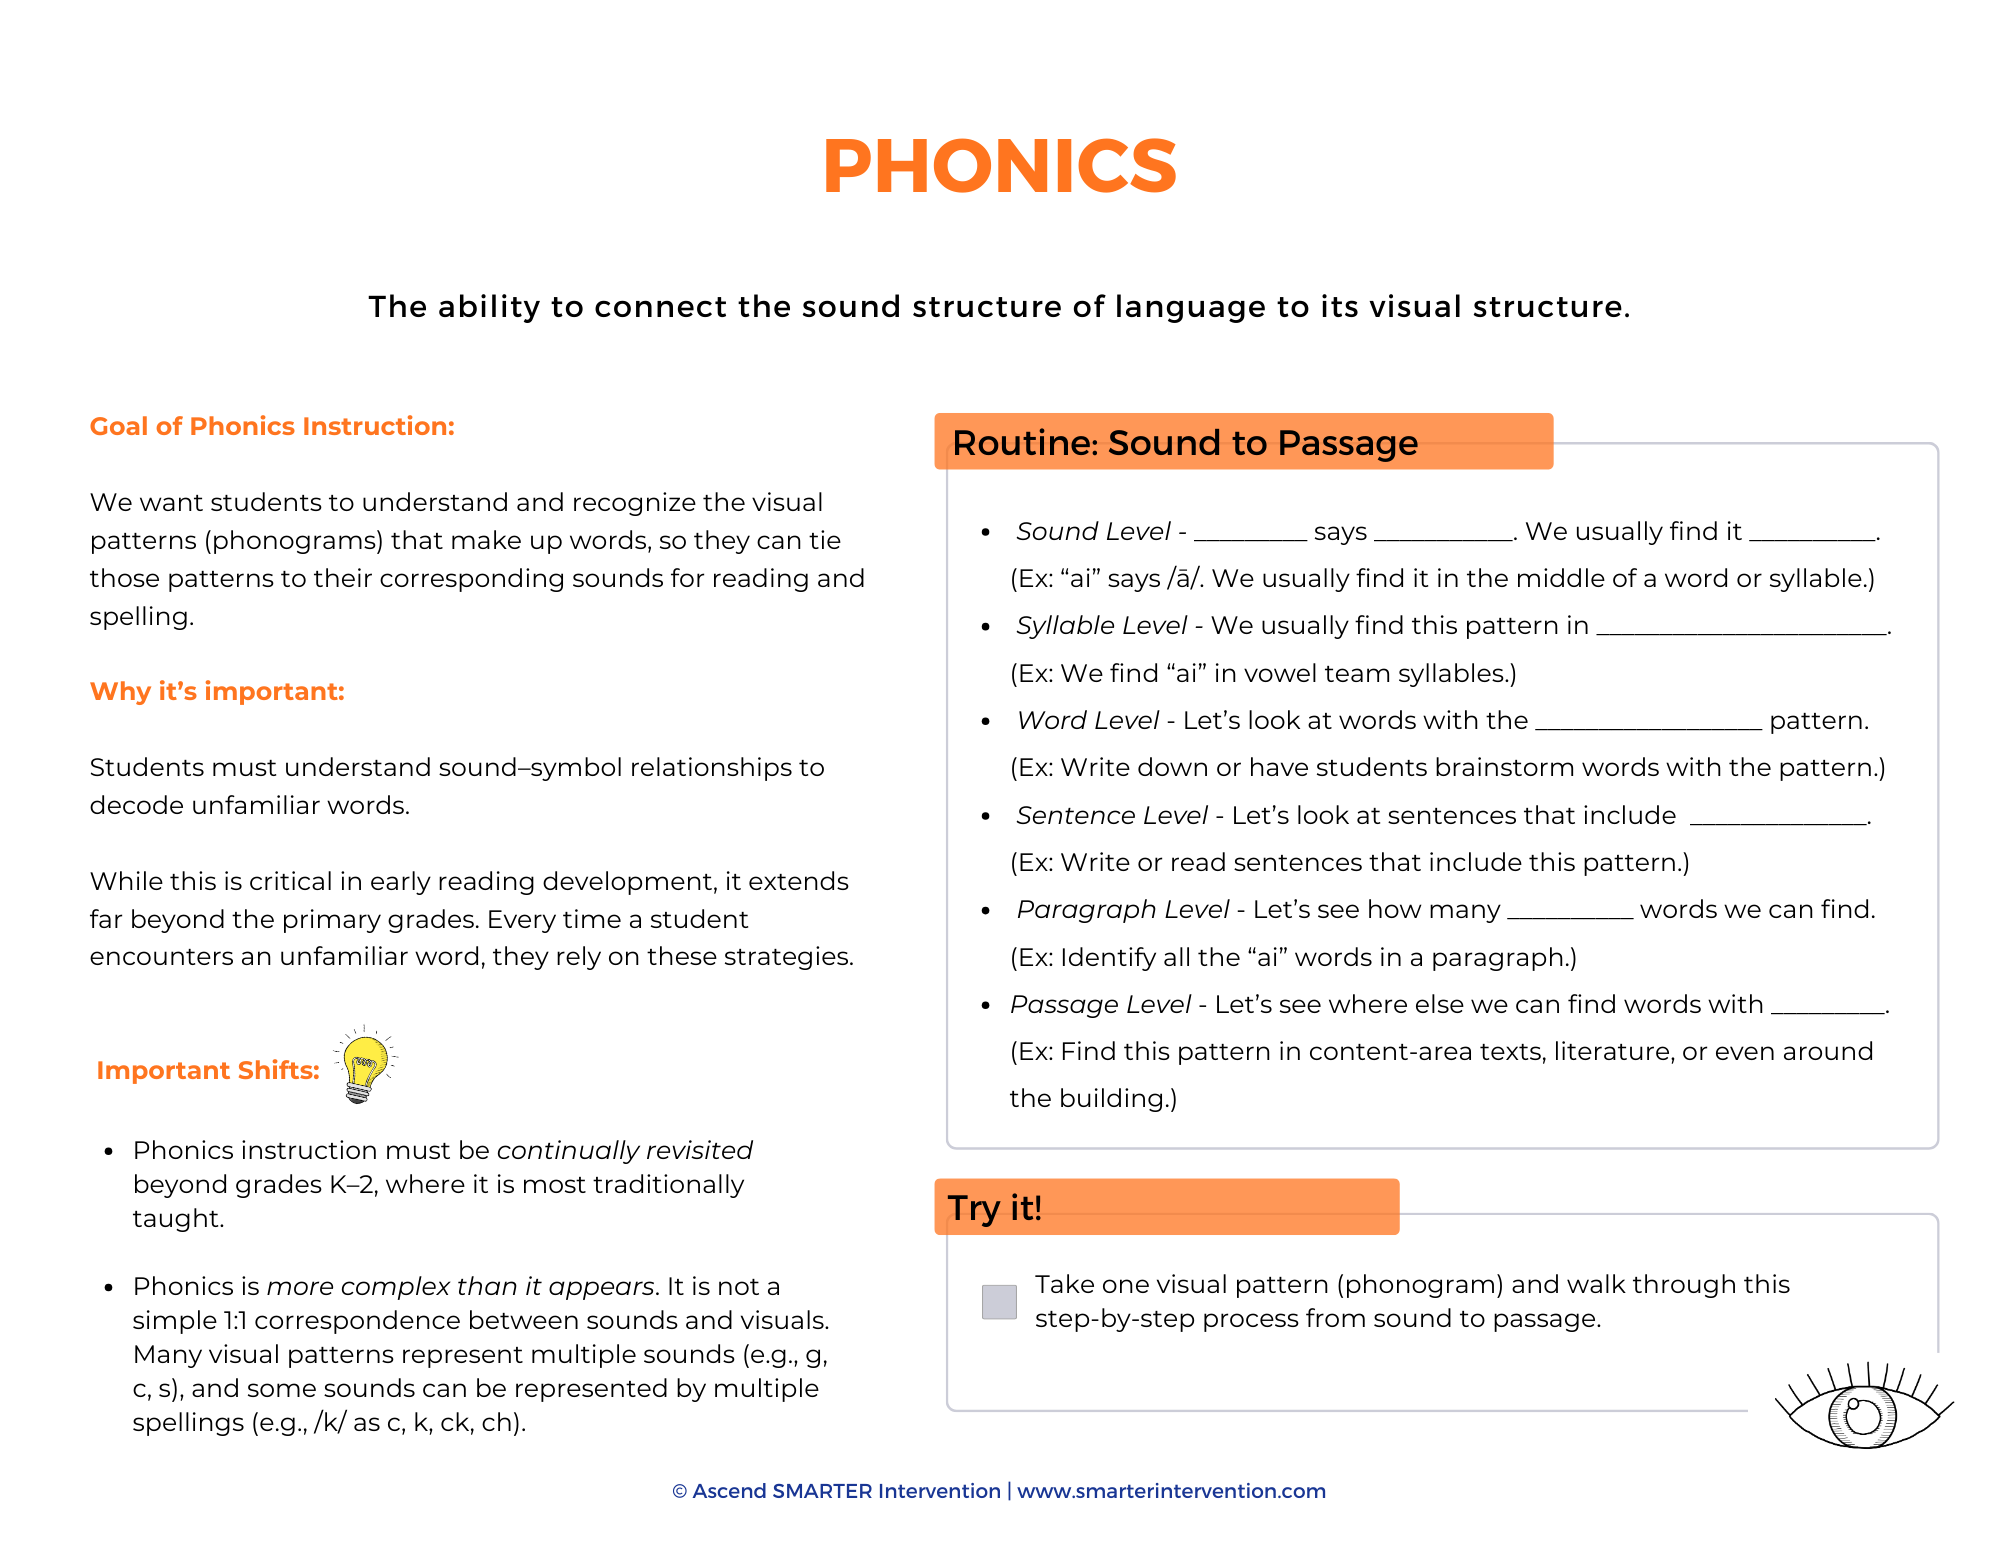
What does it mean to explicitly teach a phonics rule?
Explicit instruction means we teach students:
What the pattern is
What sound it makes
Where it typically appears in words
What syllable type or spelling rule it follows
How to apply it in real reading and writing
For example, when introducing a new pattern, we say:
“OU says /ow/ like in trout or /oo/ like in soup. OU is a vowel team that usually appears in the middle of a word or syllable. Let's learn how to spot and use it.”
Then we move from isolated sound to connected application step by step.
How do we explicitly teach a new phonics pattern?
We use the same structured sequence every time we introduce a new phonics rule, whether we’re teaching reading or spelling.
Here’s the process we follow:
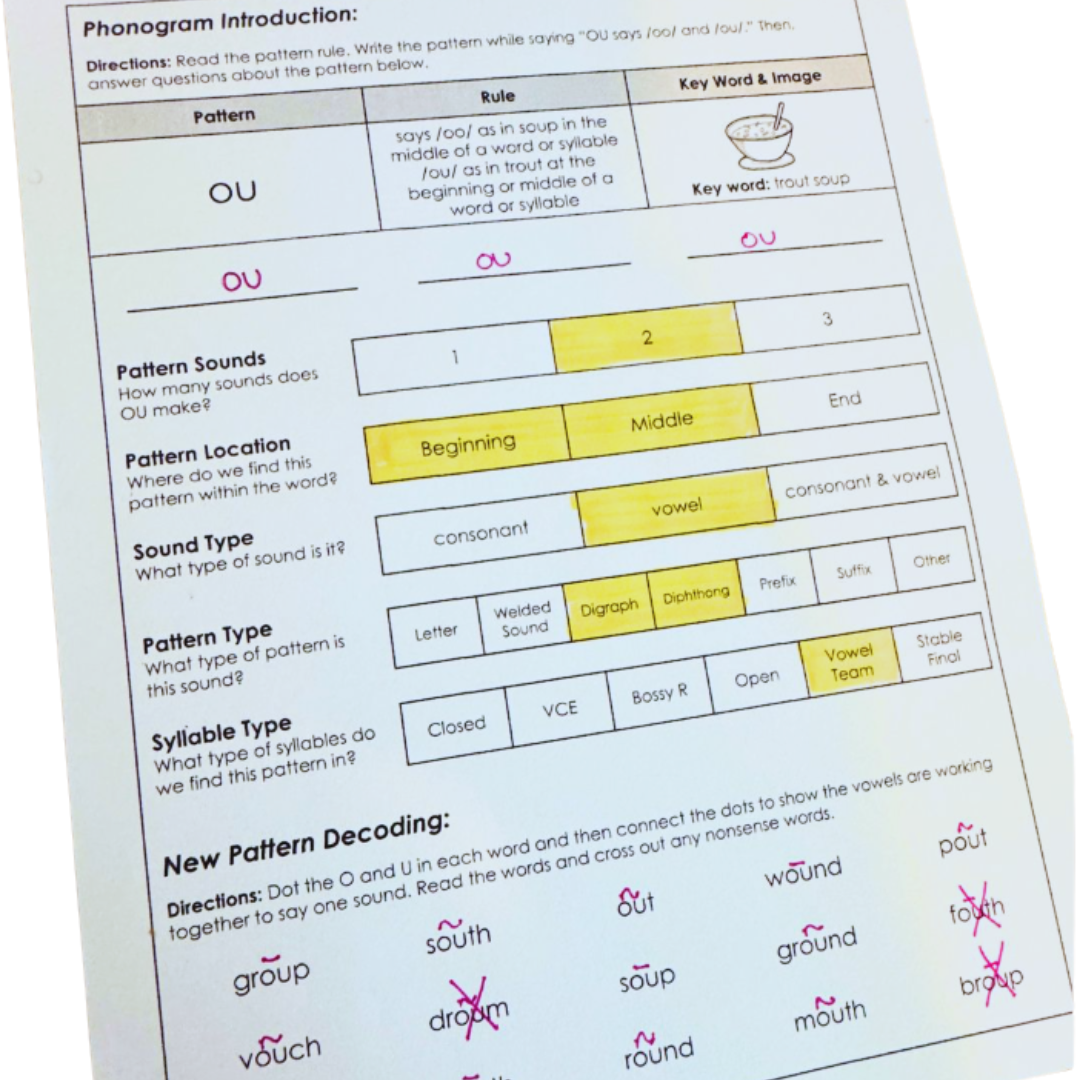
1. Introduce the Phonogram Pattern
Say the rule out loud: For example, “OU says /ow/ like in trout or /oo/ like in soup.”
Write it three times while saying the rule aloud
Anchor the rule with a visual or keyword: (Trout Soup is our visual/keyword phrase for OU)
This multisensory repetition helps students encode the sound-symbol relationship.
2. Teach the Pattern's Rule & Syllable Type
We connect each pattern to its syllable type, so students have a mental “bucket” to organize it:
OU is a vowel team syllable
CK is used in closed syllables
AR is a Bossy R syllable
Y, as a vowel, occurs in open syllables
This gives them structure and predictability across lessons and helps them apply new rules later.
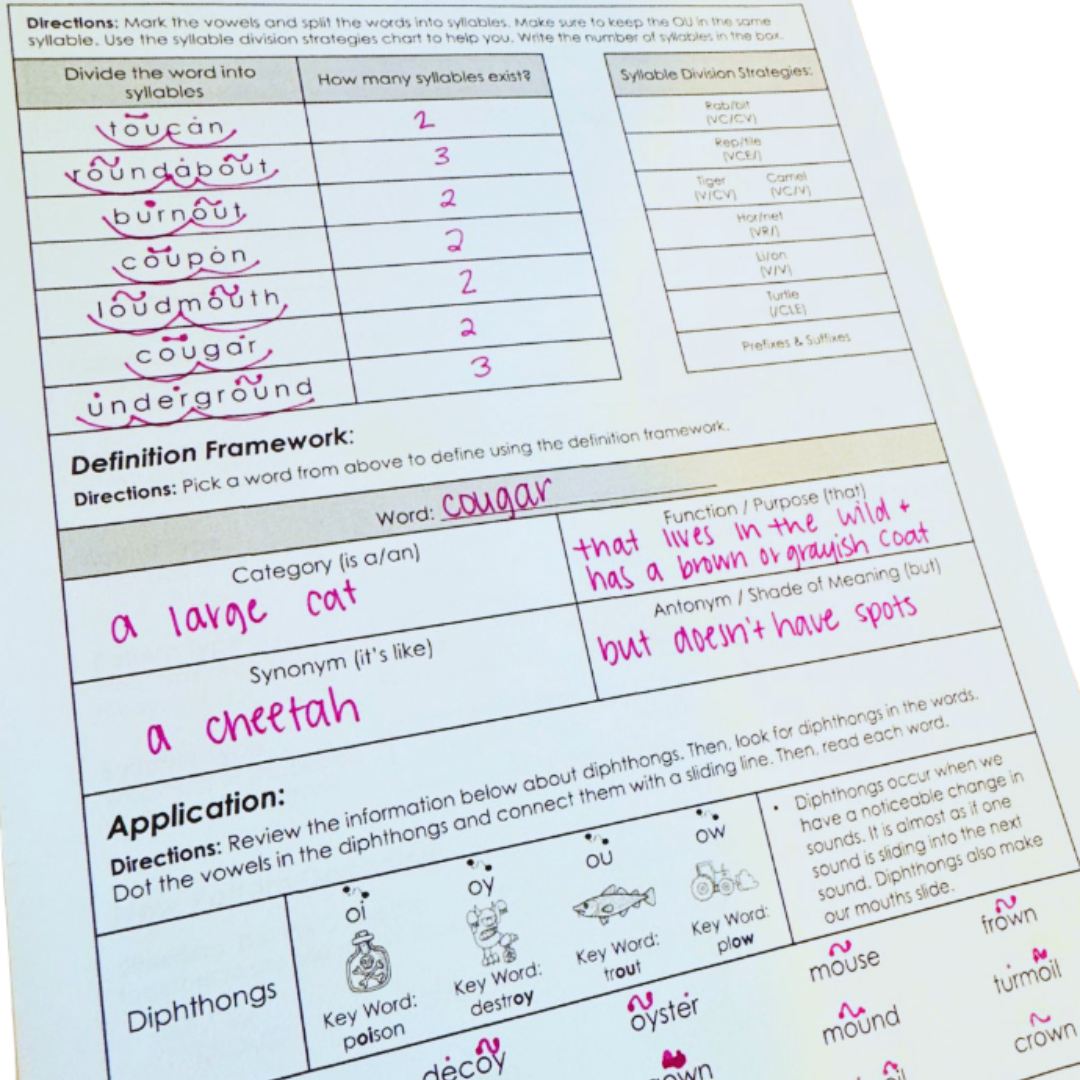
3. Decode at the Word & Multisyllable Level
We move from simple to complex:
Start with single-syllable words
Progress to multisyllabic words when students are ready
Teach syllable division strategies if the rule appears in longer words
This decoding practice shows students exactly where and how the pattern appears and builds fluency through repetition.
4. Practice the Pattern in Sentences
Once students can read or spell words with the pattern, we move to connected text:
Read or write sentences that include the target rule
Ask students to highlight or identify the pattern
Reinforce grammar, punctuation, and sentence meaning
We use sentence-level practice for both reading and spelling, so students start to generalize the pattern across skills.
5. Extend to Paragraphs & Real Texts
Then, we introduce paragraph-level practice:
Use decodable passages or student-generated paragraphs
Encourage students to choose target pattern words to include in their writing
Ask them to spot the pattern in authentic books, articles, or classroom texts
The goal: transfer and generalization. Students begin to see the pattern everywhere, not just in a worksheet.
How does this connect to the six syllable types?
Every pattern we teach connects back to a syllable type, which helps students categorize and apply what they’ve learned. Here’s a quick refresher:
Closed – short vowel, closed in by a consonant (cat, help)
Open – long vowel at the end of the syllable (go, me)
Vowel-Consonant-E (VCE) – silent E makes the vowel long (cake, bike)
R-Controlled (Bossy R) – vowel followed by R (car, bird)
Vowel Team – two vowels together make one sound (rain, soup)
Stable final – syllable ends in -le (table, candle) or a stable pattern like -tion (nation) or -ture (picture).
We build this connection into every rule we teach so students don’t just memorize, they understand and can start to organize the patterns into their mental filing cabinet.
What if students struggle?
Oh, they will! It’s not if, it’s when…and that’s why this routine works. If students:
Confuse the pattern with a similar one (e.g., OU vs. OW)
Forget which spelling goes where (e.g., AI vs. AY)
Struggle to move from sound → word → sentence
We revisit:
The anchor visual or keyword
A simpler version of the word or sentence
Multisensory support (tracing, tapping, highlighting)
The other benefit here is that we ALWAYS follow the exact same routine, so it becomes very familiar for students. That repetition is key, and it works over time to help students build mastery. Plus, it’s great for us as educators because we can get into a solid routine as well!
Ready to teach new phonics patterns explicitly yourself?
We’ve got you covered.
If you want to connect the sound structure of language to the visual structure, try our FREE phonics routine. This routine gives you an easy-to-follow process to help students understand sound–symbol relationships. And it can be used with any program!
And if you’re ready to go deeper…
Join us for one of our FREE on-demand PD trainings to learn more about our exact process for supporting students who need extra support.
If you work in the elementary setting - Join us for our FREE training, How to Structure Elementary Literacy Intervention. Click here to register.
If you work in the secondary setting - Check out Delivering Effective Secondary Literacy Intervention: The 5-Step Framework for Grades 6–12 to learn more and get free resources you can use to support your instruction! ➡️ Click here to sign up!